How to configure the multisig?
To use this multisig you need to:
- Log in to your Nexpay account, and go to the settings
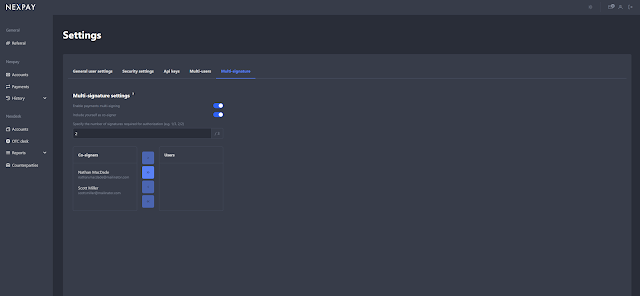
- Open the “Multi-signature” page in the settings
- Enable the multisig
Please note that to use this functionality, you must have at least one user with approved full access!
- Choose whether you want to take the role of payments co-signer or not
- Then choose the users that will have the payment co-signer right
- Finally, indicate how many signatures would be required to approve the payment
How to make the payment?
- Go to the payments page
- Fill in the payment form as usual
- Confirm the payment
As a general note, if the multisig is enabled, none of the payments will be processed automatically. All payment orders will have a pending status and be displayed on the payments history page under the “Prepared” list waiting for other users to sign/reject them.
- After the payment order is created all co-signers will receive an email notification
- After receiving the email they should open the payments history page and open the “Prepared” list
- Next to each payment, they will see how many users have already signed and rejected, and how many signatures are required in general
- Finally, the user needs to sign or reject the payment(-s) - this can be done one by one or in bulk.
Please remember that if you have marked yourself as a co-signer, the moment you make a payment, you will automatically sign it. Other users will have to sign it manually.
And vice versa. When another user creates a payment, he/she will sign it automatically at the moment of creation. Other users, including you, will have to sign it manually.